Note Editor
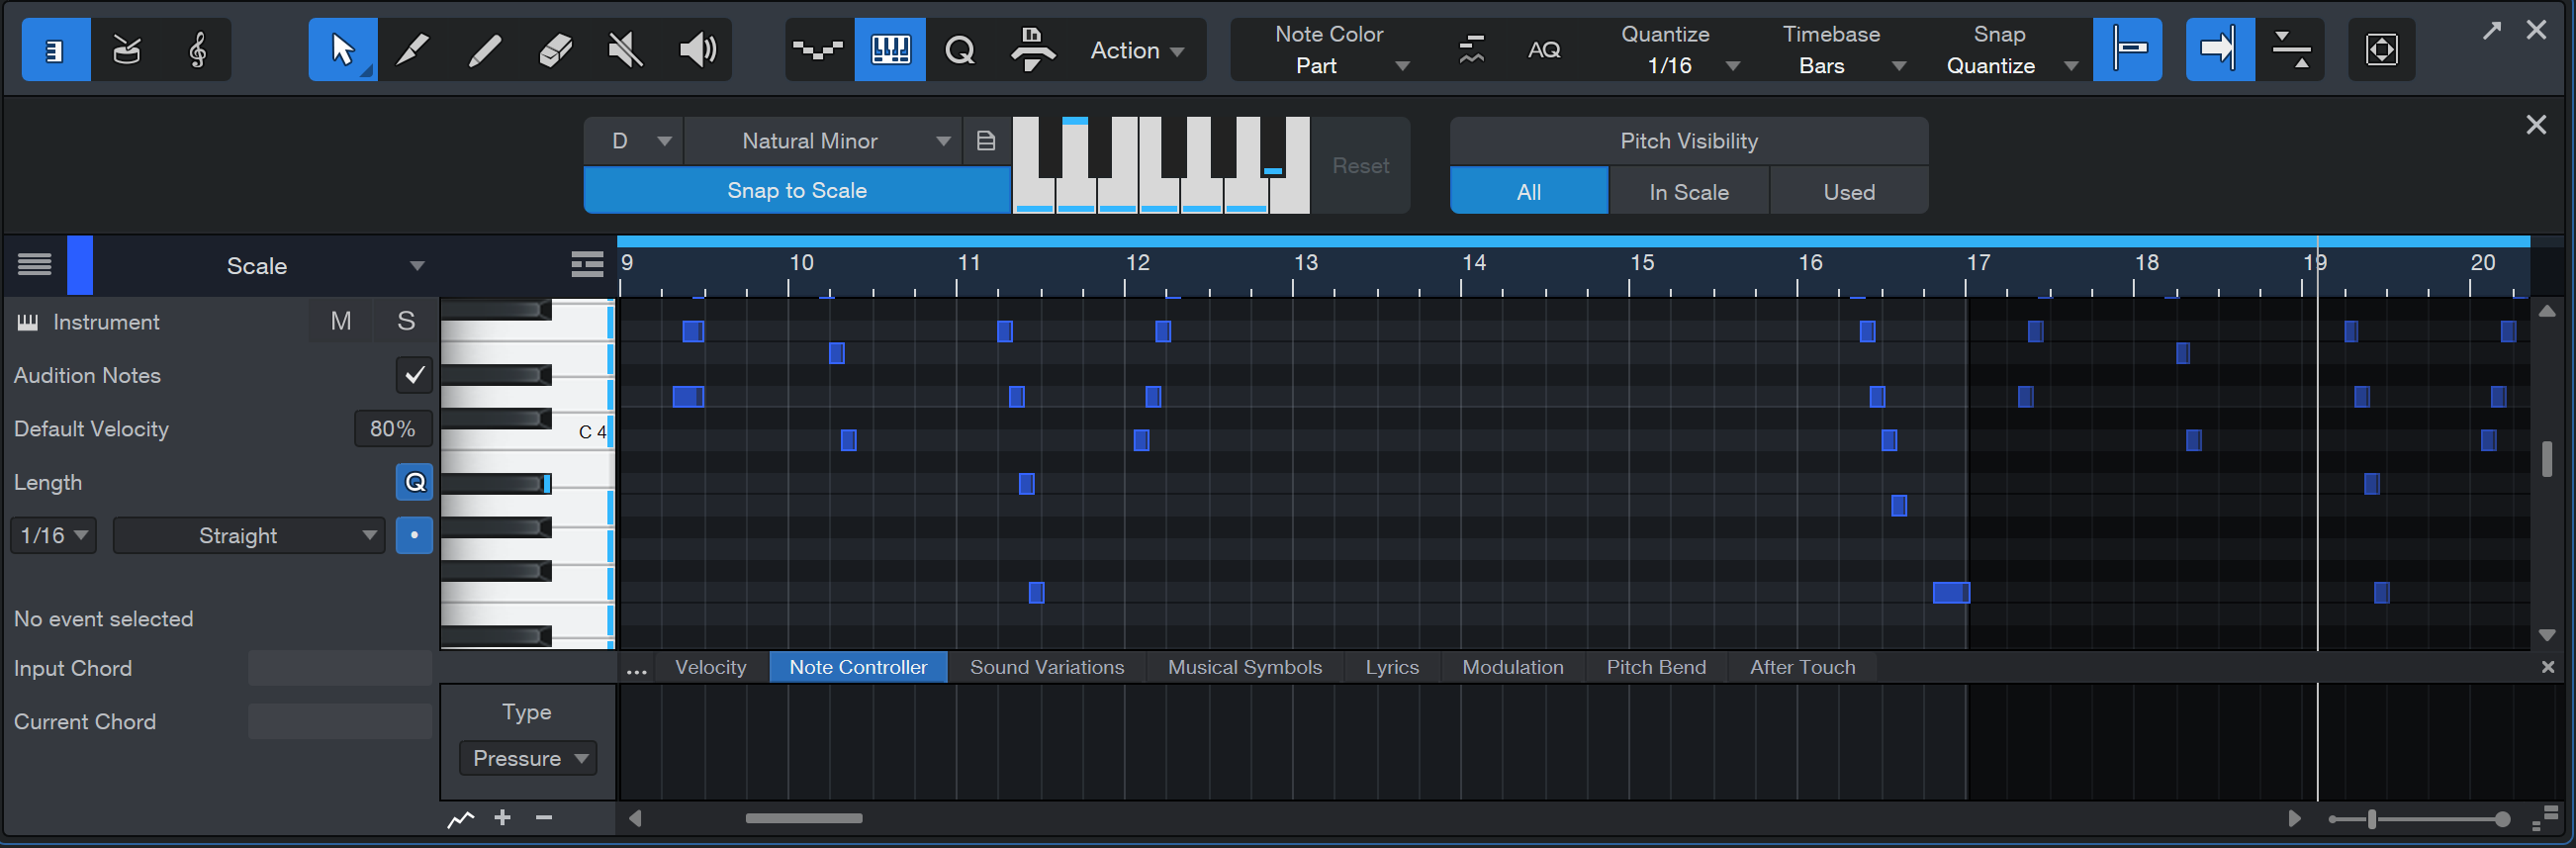
Instrument Parts contain notes, which represent musical performance data and are a type of Event. Notes can be moved, cut, copied, pasted, duplicated, and drawn using mouse tools, key commands, and certain Event menu commands. Multiple notes can be selected and edited together, as with other Events.
For quick editing of all notes in a Part or on the Track, use [Ctrl]/[Cmd]+[A] to select all of the notes in the focused Part in the Note Editor or [Ctrl]/[Cmd]+[Shift]+[A] to select all notes in all Parts on the Track. You can also access the full set of selection actions by navigating to the Select section of the Edit menu.
The View buttons on the left side of the Note Editor toolbar provide three different ways of viewing, entering, and editing note data: Piano view, Drum view, and Score view.
- Piano View displays the note data in "piano roll" style. A vertical keyboard graphic helps visualize notes and scales, and can be used to trigger the notes.
- Drum View removes the vertical keyboard and allows more room to display sample names horizontally for each vertical note position.
- Score View shows the note data on a musical staff, where you can add musical symbols for dynamics and articulations that also enhance playback.
We'll describe the following features as they apply to the Piano and Drum views. For details about Score view, see the Score Editor chapter.
Arrow Tools
Studio One Pro offers two Arrow tools for editing Note Events: Extended and Basic. Choose the one you’d like to use by clicking on the Arrow tool icon or by pressing [1] with the Note Editor open to toggle between the two.
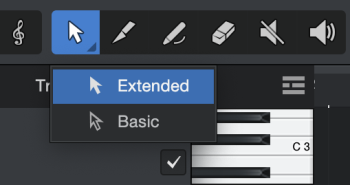
The Extended Arrow tool in the Note Editor is used with notes in essentially the same way as the Arrow tool in the Arrange view is used with Events. Multiple notes can be selected and edited together in the same way as Events.
At high zoom factors, the Extended Arrow tool leverages context-sensitive functionality to enact different tasks, depending on which area of a Note Event you move your cursor over. This allows you to perform various critical tasks without the need to switch tools:
-
Edit Velocity: Click and Drag vertically from the upper area of a Note Event to raise and lower Velocity
-
Mute: [Alt/Option+Click] in the upper area of a Note Event to Mute
-
Cut: Click at the lower area of the Note Event to split it
-
Cut Deep: [Alt/Option+Click] at the lower area of a stack of Note Events in the same location (of the same pitch) to split them all
-
Glue: Click at the lower area between two adjacent Note Events with the same pitch to group them
The Basic Arrow tool can be used to move Note Events or trim them by clicking and dragging their endpoints, disabling the above-listed features of the Extended Arrow Tool.
Moving Notes
To move a note using the Arrow tool, click anywhere on the note and drag left, right, up, or down. Dragging the note left or right moves it backward and forward in time, relative to the current Edit view timebase and timeline zoom. Dragging the note up or down transposes (changes the pitch of) the note. In Piano view, the transposition interval can be determined by using the vertical keyboard display to the left of the Note Editor.
Creating Notes
To create a note using the Arrow tool, double-click in any empty space in the Edit view. A note is created at the location you've specified, its length determined by the currently selected Quantize value. Double-click a note with the Arrow tool to delete it.
Resizing Notes (Piano View)
To size any note using the Arrow tool, float the mouse to the left or right edge of the note to reveal the Sizing tool. When this tool appears, click-and-drag left or right to size the note. As with Events, notes can be sized and resized any number of times. A Part can also be sized in this way, by floating the cursor near the top of the Part's beginning or end, revealing the Sizing tool.
To change the length of a note while simultaneously resizing the previous or following note to match, hover your cursor near the beginning or end of a note, press and hold [Alt]/[Option] to enable Resize Adjacent Notes mode, and click and drag the note to resize.
When sizing multiple selected notes in the Note Editor with the Arrow tool, three additional behaviors are possible using modifier keys. Select multiple notes, then click on the end of one note and drag it to the right just a small amount. While still dragging that note, if you press certain keys on your computer keyboard the following will happen:
- [Ctrl]/[Cmd] + drag will snap the length of all notes to match the length of the clicked note.
- [Alt] + drag will stretch the notes across the time grid. If the outer edge of either of the outermost notes is dragged, the stretching can go on indefinitely. If an inner edge of any note is dragged, the middle notes will eventually end up on top of the outermost notes.
- [Alt] + [Ctrl]/[Cmd] + drag the right edge of one note makes all of the notes end at the same time. [Alt] + [Ctrl]/[Cmd] + drag the left edge of one note makes all of the notes start at the same time.
Duplicating Notes
To duplicate selected notes using the Arrow tool, hold [Alt]/[Option] on the keyboard, click on the selection, and drag left or right. Release the mouse button when the desired position is reached, and the selection is duplicated to this position.
More Arrow Tool Tips
-
To switch temporarily to the Eraser tool while the Arrow tool is selected, press and hold [Ctrl]/[Cmd].
-
To switch temporarily to the Split tool while the Arrow tool is selected, press and hold [Ctrl+Shift]/[Cmd+Shift].
When multiple Parts are visible in the Editor, only one is actively available for editing at a time. For example, when doing a Select All operation, only notes in the currently active Part are selected. To activate a Part, click on any note or empty space within it.
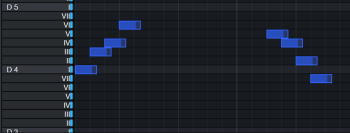
Strums
A group-selection of Note Events can quickly be arranged into a Strum. With a group of Note Events selected, begin by clicking and dragging from the middle of one of the group’s Note Events, and then hold [CMD]+[OPT] / [CTRL]+[ALT] to create a Strum. This can be done from any Note Event in the Group.
Note that Strums are affected by Snap settings. For a more humanistic sound, you may opt to turn off Snap (N) while creating Strums.
Various strums.
Split Tool

In Piano view, the Split tool allows you to split notes so that they become two separate notes. Clicking on any note directly splits the note at that position, while selecting multiple notes and then splitting, splits all selected notes. Holding [Alt] when clicking with this tool performs a split of any selected notes, as well as a split of the part itself, so that one part becomes two.
To switch temporarily to the Arrow tool while the Split tool is selected, hold [Ctrl]/[Cmd].
Split at Grid
It is possible in the Piano and Drum views to split a single note into multiple notes based on the current Quantize setting. Select any number of notes and choose Split at Grid from the Musical Functions menu. Notes are split based on their position relative to the bar line, with splitting occurring only up to the next bar line after the note start time.
The Split at Grid function can also be applied to whole Instrument Parts and Audio Events.
Paint Tool
The Paint tool in the Note Editor is used to draw notes in an Instrument Part. To draw a note, click at the desired position. The default length for new notes can be set in the Note Editor Inspector to the right of the keyboard interface. Click the note again to delete it.
To momentarily select the Arrow tool while using the Paint tool, hold [Ctrl]/[Cmd] on the keyboard.
Creating a New Part
To create a new Part in the Edit view with the Paint tool, click and drag in any open area in the Editor timeline. You can resize Parts while the Paint tool is selected, by floating the cursor near the top of the start or end of the Part, which reveals the Sizing tool.
Painting in Piano View
When drawing in Piano view, the Paint tool snaps to certain vertical and horizontal positions based on the Quantize and Scale settings. When the cursor hovers over the Note Editor, the note value for the current cursor position is highlighted on the vertical keyboard.
As you enter new notes, click-and-drag to the right to make the note any length you want. To edit the velocity of a note as it is being drawn, drag up and down after you click to draw the note.
To modify the length of an existing note, hover the cursor at the edge of the note to reveal the Sizing tool, then click-and-drag.
Painting in Drum View
When drawing in Drum view, the Paint tool snaps to specific horizontal positions based on the Quantize setting. When the cursor hovers over the Note Editor, the Pitch name and note number are highlighted in the Pitch Names list.
Hold [Alt] and then click-and-drag to draw a line of notes at the current Quantize value.
Adjusting Velocity Values
To edit the velocity of an existing note in Piano view, hold [Alt+Ctrl]/[Cmd +Opt] on the keyboard and click-and-drag up or down on the desired note. Optionally, with sufficient zoom applied in the Edit Window, the Arrow Tool can be used to edit a note event’s velocity by clicking the top third of the note event and dragging vertically. Finally, you can also edit the velocities of notes in the Part Automation lane of the Note Editor, which is discussed in the Instrument Part Automation section of the Automation chapter.
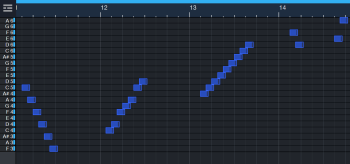
Line Drawing Mode
Press and hold [Alt] on the keyboard with the Paint tool selected to enter Line Drawing mode. In this mode, you can draw a line of note Events in the Note Editor, and you can draw lines in automation envelopes, as discussed later in this manual. This function also works when the Paint tool has been temporarily invoked by pressing [Ctrl]/Cmd].
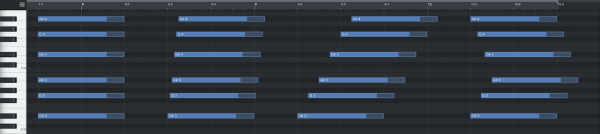
Transform Tool for Note Velocity
![]()
If you want to edit velocity for many notes at once, you'll find the Transform Tool very useful. Similar to the way the Transform Tool in Arrange view is used for scaling and shaping automation curves, the Transform tool in the Note Editor lets you scale and shape note velocity data.
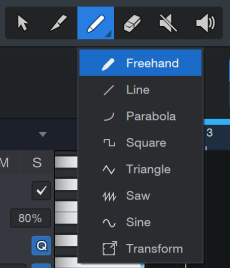
To use the Transform Tool, click the triangle at the edge of the Paint tool in the Note Editor, and choose "Transform Tool" from the pop-up list. With this tool, select a range of velocity values in the Velocity display below your chosen notes. The selected values can then be scaled smoothly up or down by dragging the handles at the top or bottom of the selection.
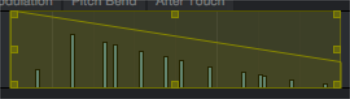
You can also drag the handles at the corners of the Transform selection, to scale the selected velocities with a sloping action, as shown above. This makes it easy to create smooth changes in velocity across a range of notes.
Eraser Tool

The Eraser tool in the Note Editor is used to delete notes. With the Eraser tool selected, click directly on any note to delete it. When multiple notes are selected, clicking any one of them with the Eraser tool deletes all selected notes. Click and drag with the Eraser tool (starting in empty space) to delete all notes you touch.
You can temporarily switch to the Arrow tool while the Eraser tool is selected by holding [Ctrl]/[Cmd].
Mute Tool

The Mute tool is used in the Note Editor much as it is used in the Arrange view. With the Mute tool selected, click on any note to mute it, and click on any muted note to unmute it. Click and drag with the Mute tool to mute all notes that fall within your selection.
Listen Tool

The Listen tool is a quick way to audition a section of a Track while editing. With the Listen tool selected, click and hold inside the Editor window to solo the Track and start playback from that position. Playback continues until the cursor is released; then, playback stops and the Track is no longer soloed.
Step Record

Step Recording is a special, note-by-note method of recording musical note data. Rather than playing in real time, or drawing in notes with the Paint tool, you can simply specify a rhythmic value and press keys on your MIDI controller to enter notes and chords with ease and precision.
For more information about Step Record functions, check out the Step Record chapter.
The Scale Editor
![]()
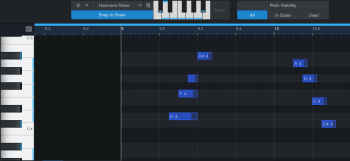
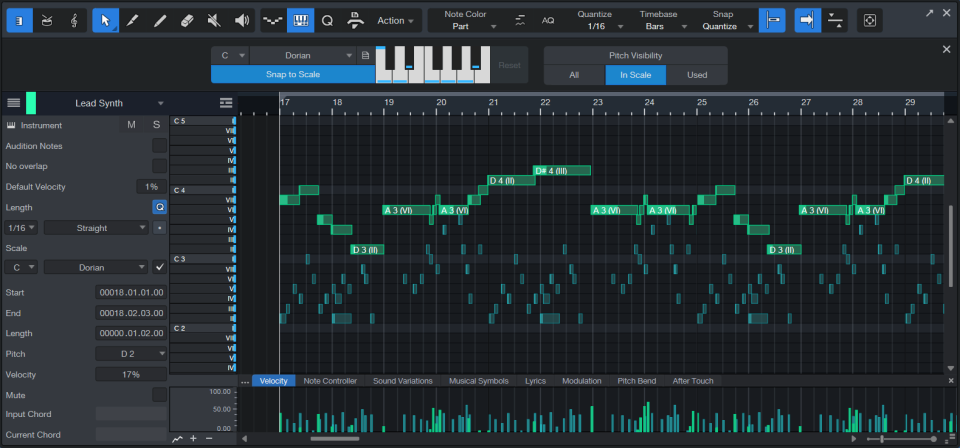
The Scale function can only be enabled in Piano view. After clicking on the Scale Editor icon in the toolbar, the Scale Editor will appear below it. Select a scale by choosing the starting note and the musical scale in the respective dropdown menus.

The notes contained in the selected scale are marked on the Note Editor's vertical keyboard display, as well as in the single-octave keyboard display in the Note Editor toolbar.
After a scale has loaded, you’ll notice that the notes within that scale have a thin blue line along the bottom of the key. Root notes will have two blue lines on the key–one at the top of the key, and one at the bottom.
Load/Store New Scale Presets
The scale editor allows you to define your own custom scales. It is simple to create and store your own scale preset using the Load/Store button [ ] and the Note Editor’s one octave piano roll display:
-
Start by choosing one of Studio One Pro’s preset scales from the scale dropdown list.
-
To change a note within the keyboard display, click the key to enable/disable the note. The thin blue line will disappear when it’s been disabled and reappear when it’s been enabled.
-
The root key is always in scale and cannot be toggled off. Use Alt (Option) + Click to change the root key. Note that changing the root key also shifts the “in scale” keys accordingly so that the scale type remains intact (for example, changing a C Major scale to a D Major scale works by simply alt+clicking the “D” key).
-
-
Once you settle on the notes you’d like to include within your new scale preset, click onto the Load/Store button.
-
From this dropdown menu, you can store, update, rename and delete your scale presets.
Once a new preset is stored, you can find it at the bottom of the Scale dropdown menu. Your scale presets will also be stored locally within your computer files. To access this via the browser, follow this path: Files/Studio One/ Presets/User Presets/Musical Scales.
Note: If you want existing notes to conform to a scale you have just selected, first select the notes, then select Apply Scale from the Action menu in the Note Editor toolbar. This can be done in Piano view or Drum view, and the change is applied instantly in Score view.
Snap to Scale
Clicking onto the Snap to Scale button will change the Note Editor background so the notes of the currently-selected scale are highlighted:
Pitch Visibility
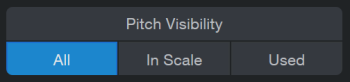
The pitch visibility options next to the scale editor provide more options to simplify the Note Editor background. You have the choice between seeing the entire piano roll from the Note Editor displayed or folding the piano roll:
-
All: The entire piano roll will be visible. This is the default view.
-
In Scale: Only the notes within the scale you’ve chosen will be visible. In this “In Scale” view, the piano keys are replaced with step keys labeled with the interval step of each note within your chosen Scale:
-
Used: Only the notes you’ve recorded will be visible. In this view, rather than a piano view or scale step, the used notes will be labeled on the left with their octave position:
Quantize
![]()
The Quantize panel can be opened from the toolbar by clicking on the Quantize Panel button. The Quantize panel can be detached and freely placed on the screen. In this panel, you can edit all settings related to the Quantize grid that are displayed in the Arrangement.
For more information about the Quantize panel, check out The Grid topic.
Macros (Note Editor)
![]()
The Macro Toolbar is a special control panel that lets you customize your workflow in powerful ways, giving you easy access to often-used functions and custom command combinations. You can add and change command groups and buttons freely to fit your needs with the Macro Organizer.
For more information about customizing the macro toolbar and how to make the most out of the toolbar, check out the Macro Toolbar topic.
Action Bar
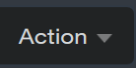
When editing in the Note Editor, several editing commands are likely to be used often. We have placed these commands in a menu that allows quick access, located to the right of the Quantize and Macro icons in the main toolbar of the Note Editor. Please see Action Menu to learn more about the action options.
Note Color
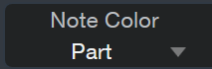
Clicking the Note Color drop-down menu in the Note Editor presents a menu of several options for Note Color:
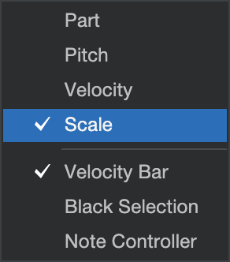
You can select any one of the four options at a time:
- Part colors the notes based on the color assigned to the Instrument Event.
- Pitch colors the notes based on their chromatin pitch.
- Velocity colors the notes based on the notes’ velocity value; from purple for low Velocity to red for high Velocity.
- Scale colors the notes based on if they are compliant with the Track’s Scale setting - blue for in-scale, red for out-of-scale.
Togglable options, selectable independent of the above, include:
- Velocity Bar toggles rendering of the velocity indicator on the left of each note event, longer for higher velocity and shorter for lower.
- Black Selection toggles the black highlighting of currently-selected Note Events.
- Note Controller toggles rendering of a stripe through Note Events associated with a note controller.
Select Part Automation with Notes
With this option enabled, selecting notes automatically selects any currently visible Part Automation within the selected note range. As a result, applying any edits to note position will automatically be applied to the selected Part Automation within the same range. This includes changing the note position manually or using Quantize, as well as cut/copy/paste/duplicate/delete operations. Part Automation currently not visible won’t be affected.
For more information, check out the Instrument Part Automation chapter.
AQ
![]()
When Auto Quantize is enabled, any selected notes will quantize and snap to the grid according to the quantize value you select.
Quantize, Timebase, and Snap
The Note Editor has independent settings similar to those in the Audio Editor. While Quantize affects the horizontal time-value snapping, the Note Editor also features Scale (vertical note-value) snapping. The Scale settings allow snapping to specific note values within different musical scales.
Autoscroll
There are three Autoscroll options available from the Note Editor:
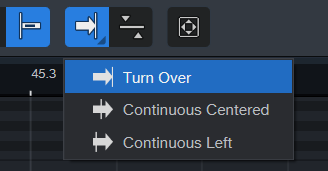
-
Turn Over: Rather than scrolling with the play cursor position, the Editor Arrangement stays in place until the play cursor reaches the edge of the visible arrangement. Then, the next section of the arrangement automatically appears.
-
Continuous Center: Play cursor stays in the center of the Editor Arranger while the arrangement scrolls by.
-
Continuous Left: Play cursor stays to the left of the Editor Arranger while the arrangement scrolls by.
Zoom and Synchronize
You can zoom in or out horizontally in the Piano and Drum views by moving the Time Zoom control, and zoom vertically with the Data Zoom control. In Score view, the Time Zoom control zooms both vertically and horizontally, as does a scroll wheel.

The horizontal zoom and timeline of the Note Editor and Arrange View can be linked. To do this, engage the [Synchronize Editor to Arrangement] button on the right side of the Note Editor toolbar.

Auto Zoom allows Studio One Pro to automatically apply an optimal Zoom to fit all content of the corresponding view in real-time. Auto Zoom can dramatically speed up your workflow! It’s available in the Arranger, Audio Editor, and the Piano View and Note View of the Note Editor.
Note: When "Link Horizontal and Vertical Zoom" is enabled (in drum mode, the small lock icon is located on the bottom right corner of the editor), auto-zoom keeps the aspect ratio of the cells (like manual vertical zooming does). In this special mode, there is no difference between the 3 auto zoom modes (vertical, horizontal, full) because both directions are linked.
For more information about zooming within Studio One Pro, check out the Navigating with Zoom chapter.
Note Editor Inspector (Piano View)
When a note is selected, its start and end positions are displayed in the Note Editor Inspector, as are its pitch, velocity, and mute status. Each of these parameters can be edited directly in the Inspector. When editing notes using the Inspector, all selected notes are affected, their values changing relative to the initial setting of each note. The one exception is that when Velocity is specified for multiple notes using the Inspector, all notes snap to the new value, regardless of their previous Velocity value.
The simplest way to edit start and end positions, pitch, and velocity is to place the mouse cursor over the parameter and scroll the mouse wheel up or down. Another way to edit a selected note’s velocity is to click-and-drag the Velocity value in the Note Editor's Inspector panel. When you release the mouse button, the Velocity value is applied to all selected notes. The value currently set by the Velocity parameter is applied by default to any new notes created with the Paint tool.
To select a different Track for editing, click the Track name at the top of the Note Editor Inspector and select one of the Tracks from the context menu.
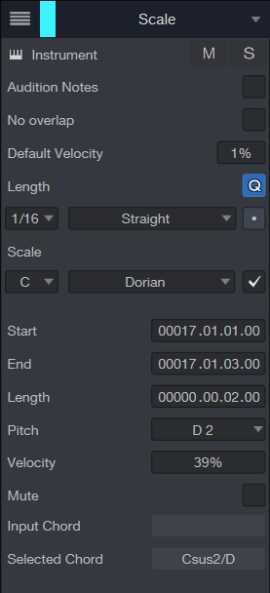
You can also Mute, Solo, or open the Device Editor for the current Track from within the Note Editor Inspector, using buttons that look much like their counterparts in the Arrange view. Below these buttons, you have the following options:
-
Audition Notes: Enable the Audition Notes option to hear the pitch of each note that is selected, created, or moved, played through the current instrument.
-
No overlap: Enable this to prevent notes from overlapping. Notes that are overlapped completely will be removed. Party overlapping Note Events will be truncated accordingly.
-
Default Velocity: When Note Events are "drawn" via Pencil Tool, this is the default velocity which is applied. This value also applies to all recorded Note Events from a MIDI keyboard, controller, etc.
-
Length: This is the default length of "drawn" Note Events. When enabled, the length follows the currently set quantize value.
-
Q: Enable this option to quantize the selected note(s).
-
Scale: From here, you can edit the current scale root note, scale preset, and snap the scale.
-
Start and End Positions: Displays the selected note’s start and end positions in the time grid.
-
Length: Displays length of the selected note relative to the time grid.
-
Pitch: Displays the pitch of the currently selected note.
-
Velocity: Displays current percentage of velocity applied to the selected note. You can adjust this by clicking the value and dragging the cursor up or down.
-
Mute: Check this option if you’d like to mute the currently selected note.
-
Input Chord: Displays the chord currently being played on an external keyboard.
-
Selected Chord: Displays the chord of the currently selected note.
Note: Both input Chords and the Current Chord position are detailed in the Note Editor Inspector. When multiple tracks are visible in the editor, all of them contribute to the chord displayed.
Multitrack Note Editing
It is possible to view and edit more than one Instrument Track at a time in the Note Editor. To do this, hold Shift and select Instrument Parts on different Tracks in the Arrangement. More Parts can be added at any time by holding Shift and selecting them in the Arrangement.
Double-click on any Part in the Arrangement to make its Track the only one you see in the Note Editor. To zoom the Editor window so it shows all of the notes the Part contains, disengage the [Synchronize Editor to Arrangement] button, hold [Alt]/[Option], and then double-click the Part. Use the lower half of the Part for this command when the Link button is active in the Arrange view toolbar.
The Note Editor also has its own Track List, opened via the Track List icon in the upper left corner of the Note Editor's Inspector panel. You can show or hide Tracks in this List via the Show/Hide button to the left of the Track name, and can independently set each Track to Edit Active via the pencil-shaped Edit button to the far right of the Track name. If a Track is shown and Edit Active is not engaged, the Track’s notes are not selectable. This allows it to be viewed as a reference, and keeps it safe from an accidental alteration.
When multiple Parts are displayed, the notes for each Part are colored with their Track colors and audition normally through their Tracks. Selected notes are displayed in white.
Also, when multiple Parts are displayed it is possible to transfer notes from one Part to another using the [Right]/[Ctrl]-click contextual menu item Transfer Notes. This removes the selected notes from the original Part, indicated with a checkmark in the Transfer Notes list, to the selected Part.
It is possible to preserve the Track List selection so it remains the same even if you switch to another Track in the Arrange view. To do this, click the Lock Track List icon next to the Track List button. Note that the Piano and Drum views share a Track List selection and the Score view has its own, which can be locked independently.
To bring a different Track into focus for editing when multiple Parts are displayed, click the Track name at the top of the Note Editor Inspector and select the desired Track.
Drum Editor
Standard piano-roll-style note editing is ideal for melodic and harmonic content, in which notes tend to have differing lengths. Drum programming and editing present a different challenge. Percussive sounds often contain their own amplitude envelope that ends at a predetermined time, which makes the start of each note the most important part. For added clarity when working on this sort of content, Studio One Pro features a dedicated Drum view that shows your drum notes as "triggers," marking the start of each note.
To enter the Drum Editor, click the Drum View button at the top of the Note Editor toolbar. You can return to Piano view
![]()
In the Drum Editor you can add, remove, and manipulate notes just as you normally can, with some useful differences. The Note Editor Inspector on the left side is basically the same as in Piano view, only without the features that don't apply to Drum view. Likewise, the tools within the Note Editor toolbar apply to the Drum view just as they do for the Piano view. The differences and additions within the Drum view are detailed below.
Enter Strings of Notes with the Paint Tool
When you enter notes with the Paint Tool in the Piano view, you click to begin the note, then drag to set its length. In the Drum Editor, since note length is not shown, you can click and drag across the grid, entering multiple new notes at divisions set by the current Quantize value. This makes creating drum patterns, fills, and rolls a more fluid process.
Edit a Drum Map
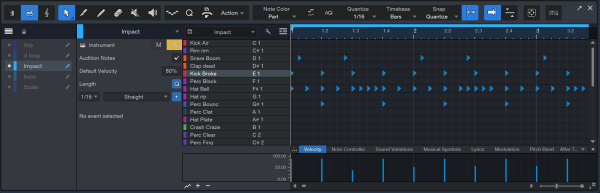
When using the Drum Editor with an instrument other than Impact, you see the full range of MIDI note names, each with its own row in the editing grid.
If you'd like to exclude certain notes that you don't plan to use, or change note names to match the corresponding sounds, click the wrench-shaped Edit button near the top of the Pitch Names panel to edit the Instrument List.
To edit the order of notes, click and drag the double line to the left of each note row. To hide a note, click the circular button in the row, turning it dark grey. To rename a note, click inside its name display, then enter your new name. You can then save the Drum Map to recall at a later time by selecting Store Preset from the Pitch Names menu.
When you're finished editing the Instrument List, click the wrench-shaped button again to lock in your changes.
Select a Drum Map
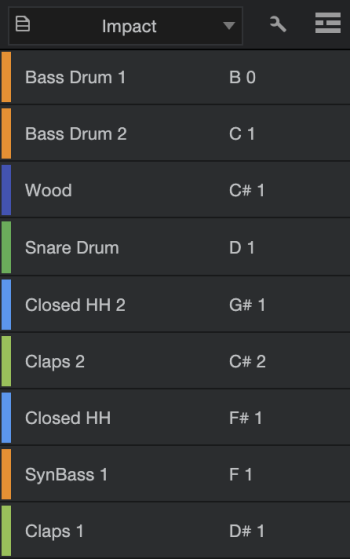
Click the drop-down menu arrow in the Pitch Names field to recall your Drum Maps. Simply select any Map from the list to load it. (A General MIDI Drum Map is provided.)
Import Drum Maps
When working with a drum instrument (or drum sample library) other than Impact, you can import a list of pitch names into the Drum Editor, known as a "Drum Map." This lets you auto-assign names to each available note that the instrument or library preset can respond to, for similar ease of programming as when working with Impact.
Drum maps can be downloaded for many commercially available instruments and libraries from http://exchange.presonus.com. To import a drum map in the Drum Editor, click the wrench-shaped button near the top of the Pitch Names panel, then simply drag the drum map file onto the list of pitch names in the left column.
Key Switches and Sound Variations
Key Switches and Sound Variations are covered in the Sound Variations topic.
Note Chase and Cut
In the Studio One/Options/Advanced/MIDI (macOS: Preferences/Advanced/MIDI) menu, you can find two options: Chase Long Notes and Cut Long Notes at Part End.
Chase Long Notes should be engaged if you would like Studio One Pro to play back a long note even if playback begins after that note's Note On position, effectively treating the playback position as the Note On. This is very useful when working with long, synthetic drone parts, for instance, which may have a Note On at bar 1 and then continue throughout the rest of the Song.
Cut Long Notes at Part End should be engaged if you would like a note to stop playback if the related Instrument Part ends before that note's Note Off position.
Select Notes
Selecting notes with your pointing device is often an efficient way to make changes in Instrument Parts, but sometimes, a bit of automation may come in handy. The Select Notes function lets you select certain notes within a part based on a range of parameters, such as "just the highest notes" or "just notes within a certain range of velocity."
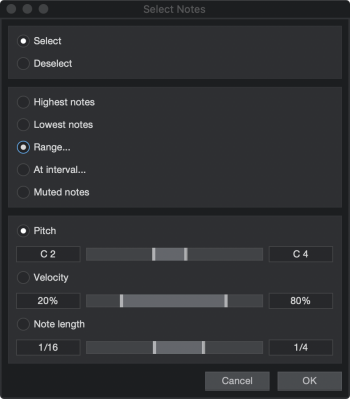
To use this function, click the [Action] button in the Note Editor, and choose Select Notes. In the window that appears, you can choose from the following actions:
- Select: Use this mode to select notes that fall within the chosen range of parameters.
- Deselect: Use this mode to deselect notes that fall within the chosen range of parameters, if those notes are currently selected. If no notes are selected, using this mode selects any notes that fall outside the chosen range of parameters.
After selecting one of those modes, choose one of the following operations:
- Highest notes: Select the highest notes that exist at any given time in the Part.
- Lowest notes: Select the lowest notes that exist at any given time in the Part.
- Range...: Select the notes that fall within a range of Pitch, Velocity, or Note Length. Select the criteria you want to focus on, then set the range of selection with the sliders.
- At interval...: Select notes based on intervals according to position on the beat grid, or numeric relationships between notes:
- Beat: Choose this mode to select notes according to their relationship to the grid:
- Beat grid: Sets the rhythmic value at which note selection is calculated.
- Selection interval: Sets the number of beats (the value of which is set with Beat Grid) between note selections.
- Start offset: Sets the number of beats to skip before making the first set of note selections.
- Selection tolerance: Sets the amount of "slope" allowed in calculating note selections, to allow for selecting notes that do not conform exactly to the grid.
- Event count: Choose this mode to select notes based on their numerical relationships:
- Select at every n-th position: Sets the numeric spacing between note selections. For example, a setting of 2 selects notes at every second note. This does not necessarily relate to the grid. If there is a space in the notes, the count between selections continues when the next notes start.
- Start selection at n-th position: Sets the number of note occurrences to skip before making the first set of note selections.
- Selection tolerance: Sets the amount of "slope" allowed in calculating note selections, to allow for selecting notes that do not conform exactly to the grid.
- Beat: Choose this mode to select notes according to their relationship to the grid:
- Muted notes: Use this option to select only the notes that are currently muted within the specified range. If a range of notes has not been specified, all muted notes within the current Event or the current Track are selected.
Tight Integration with Impact
While you can use the Drum Editor on any Instrument Part, it shares a special connection with Impact. When you view an Impact part in the Drum Editor, instead of seeing the full range of notes, you see each currently loaded sound as a row in the grid, with its name and color code visible, for easy programming and editing. Any unused notes are hidden.
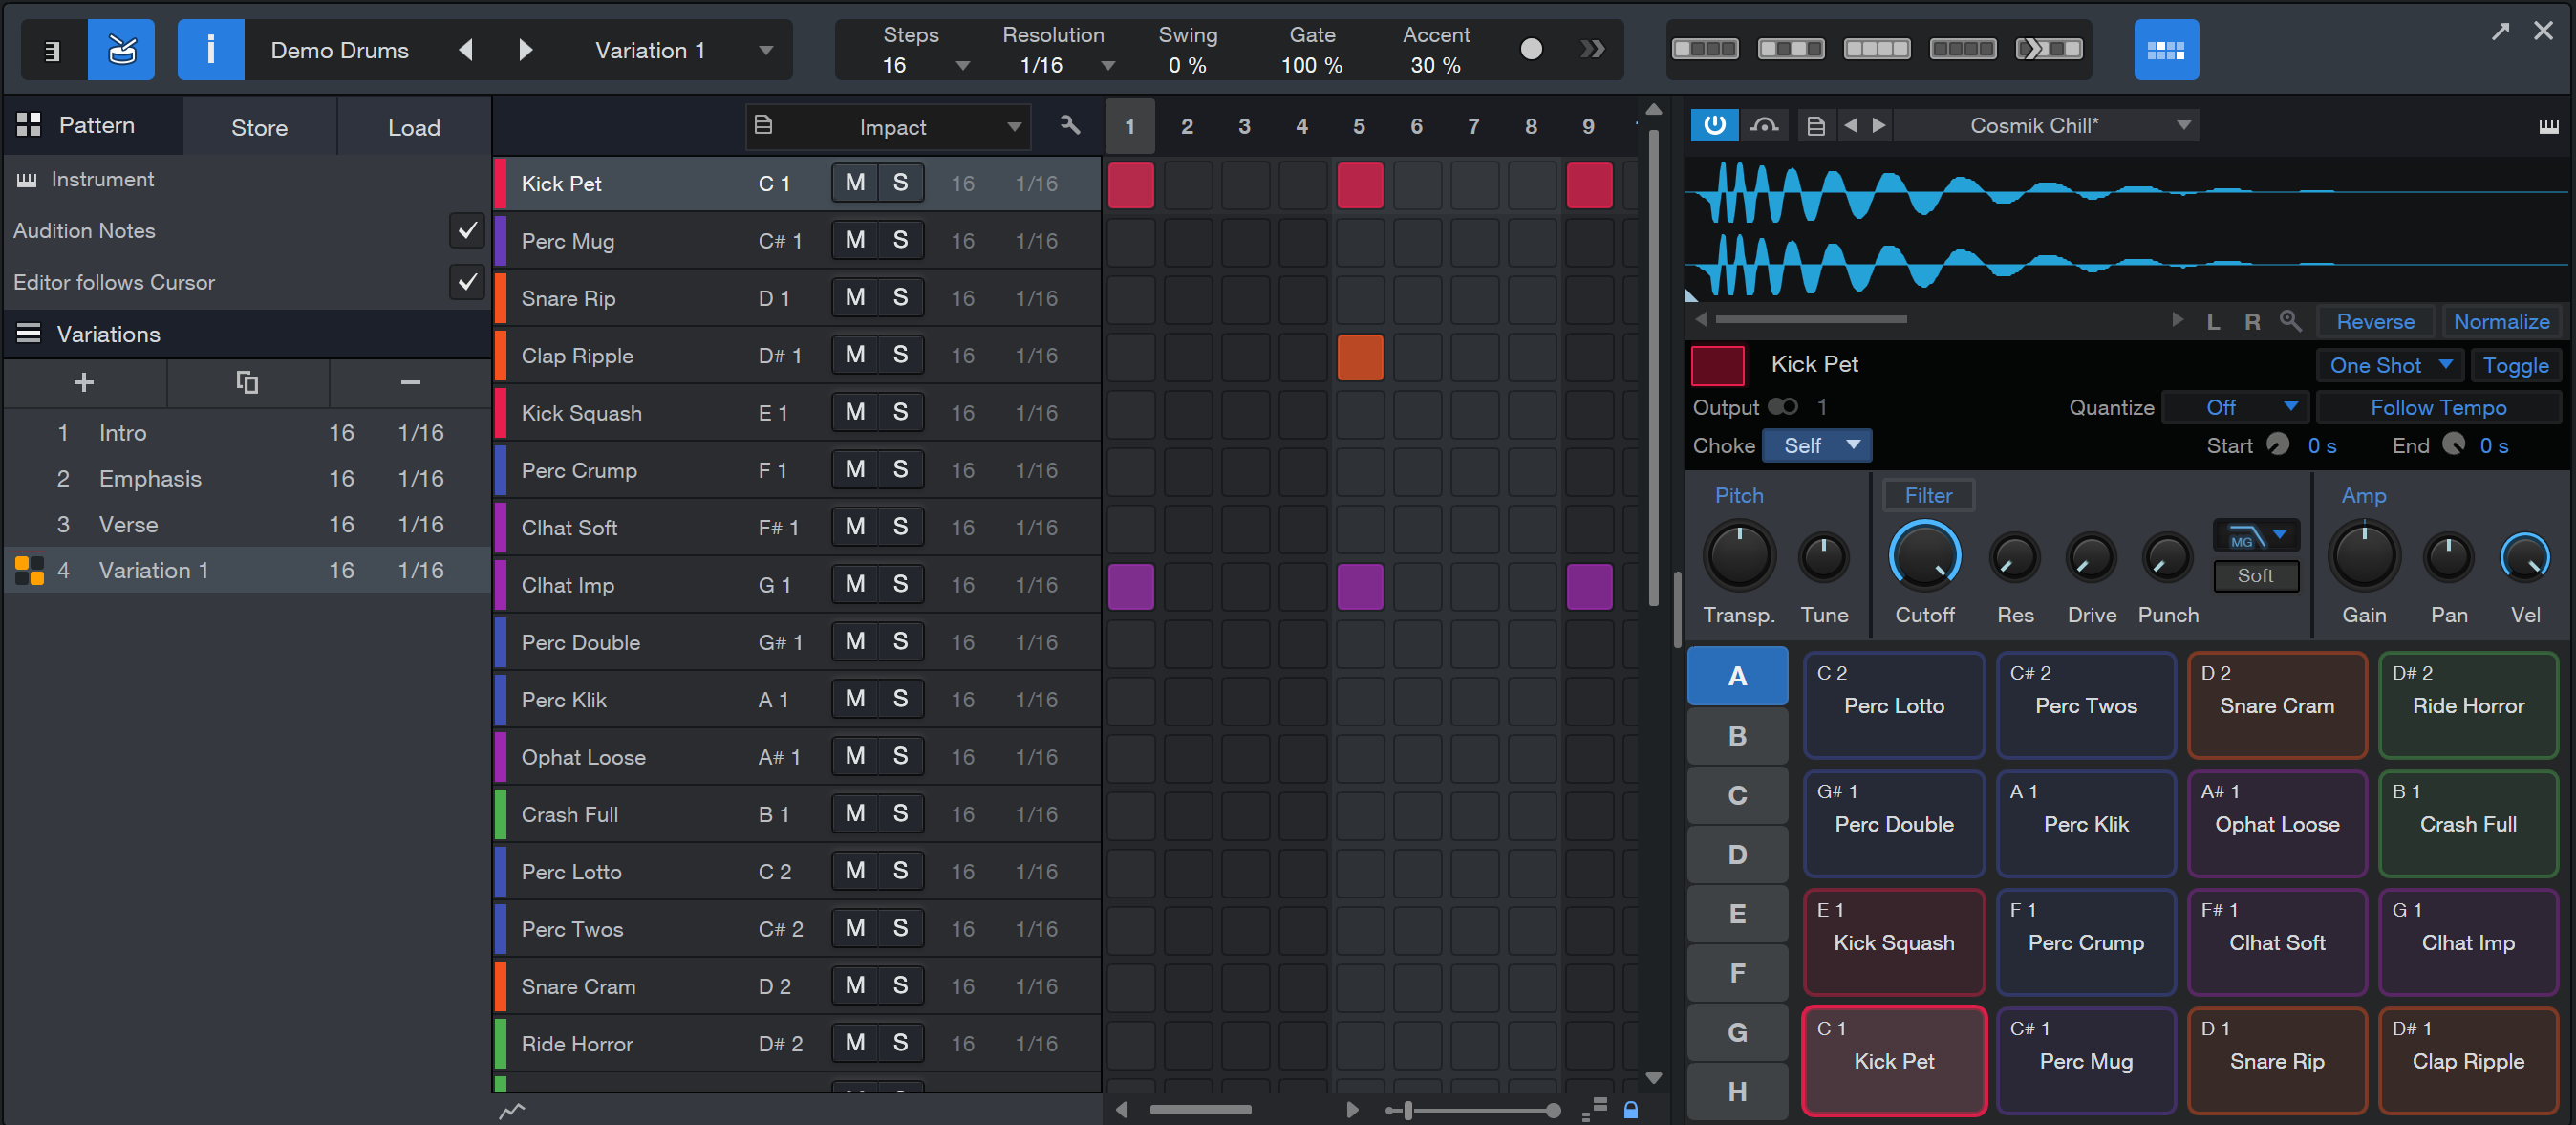
In-Place Impact Editor
Editing a virtual drum instrument like Impact while editing patterns at the same time can be tedious, particularly on a small notebook display.
To simplify the process, there is an in-place editor for Impact that provides access to most instrument parameters (pads, pad and sample editor controls, etc.) without having to open the Impact edit window.
To access this, click onto the “Pad Controls” icon located at the far right side of the Note or Pattern Editor toolbar:

After clicking this icon, the in-place editor will appear to the right of the Editor grid. To have access to all of the available parameters at once, you must adjust the width and length of the Editor until it is large enough to display each feature:
If you would like to take up less space while using the in-place editor, you can reduce the size of the Editor and toggle between Pad Controls and Drum Pad views.
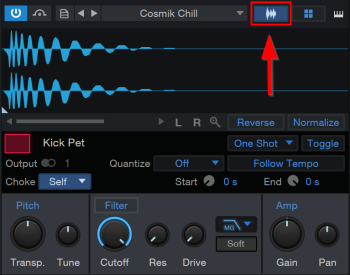
Click the Pad Controls button to view to the waveform editor and pad parameters:
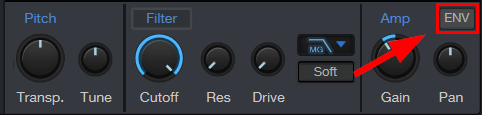
To access additional envelope controls from the Pad Control view, click onto the ENV button:
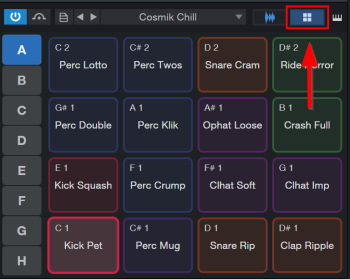
Click the Drum Pads button to view to the drum pads:
To open Impact in a separate window, click onto the “Instrument Editor” button located at the top right corner of the In-Place Editor.
Note: For this feature to work as intended, you must select Impact as the output virtual instrument on a new instrument track.
For more information about Impact parameters and other features, please refer to Impact.